
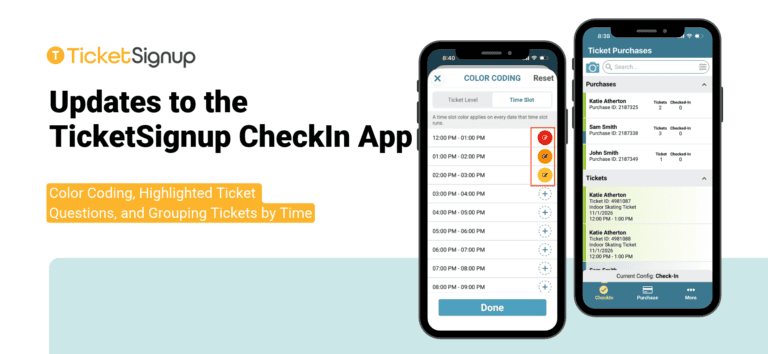
We have rolled out some updates to the TicketSignup Tickets app this month. All of these updates provide added flexibility for event directors that want to display their tickets in a more focused format than just a searchable list. These new configuration and filter options allow events to set up custom, dynamic views that can group tickets by time or color code them so staff can quickly verify that the ticket and time slot are valid at check-in.
This release (V52) provides for the following features and improvements:
–Color-coded timeslots and ticket types
— A new configuration option to dynamically display timeslots based on the current time.
–Grouping tickets by timeslot and displaying purchases in a card view
— Highlight specific questions on a purchase or ticket in the lookup list
Color-Coded Timeslots and Ticket Levels
Events now have the ability to color code either a ticket type or a timeslot across their entire event. This is a configuration setting, and is also now available in the filter options for events that don’t use a configuration.
These settings can be used to help verify that an attendee has the correct ticket for the check-in point and time.
For example, indoor and outdoor events may color code the specific ticket levels to ensure the staff members are checking in the correct tickets or providing the correct instructions/directions after check-in.
In addition, time slots with different colors can help staff recognize when someone comes at the wrong time.
Configuration Settings
To set up color-coded time slots and ticket levels for a configuration, navigate to More >> Event Settings in the app. Add a new configuration or click into an existing one.
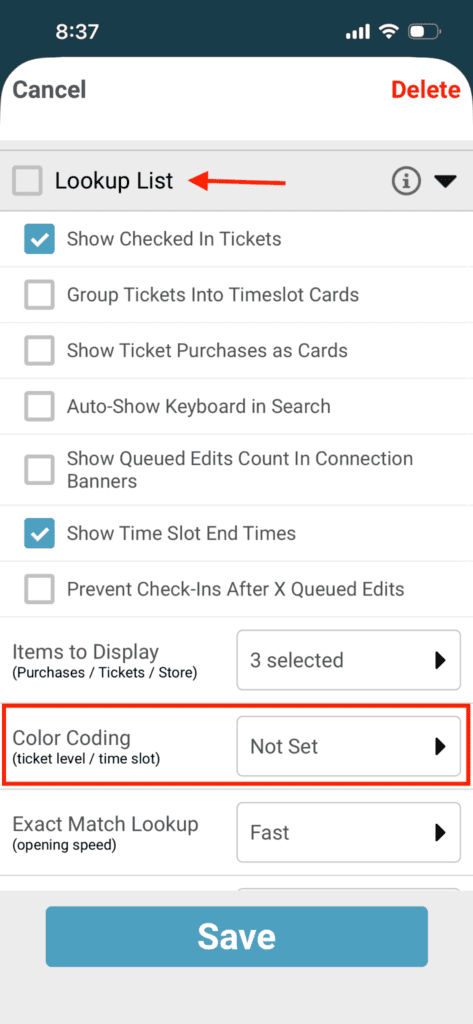
In the Lookup List settings, select the Color Coding settings.
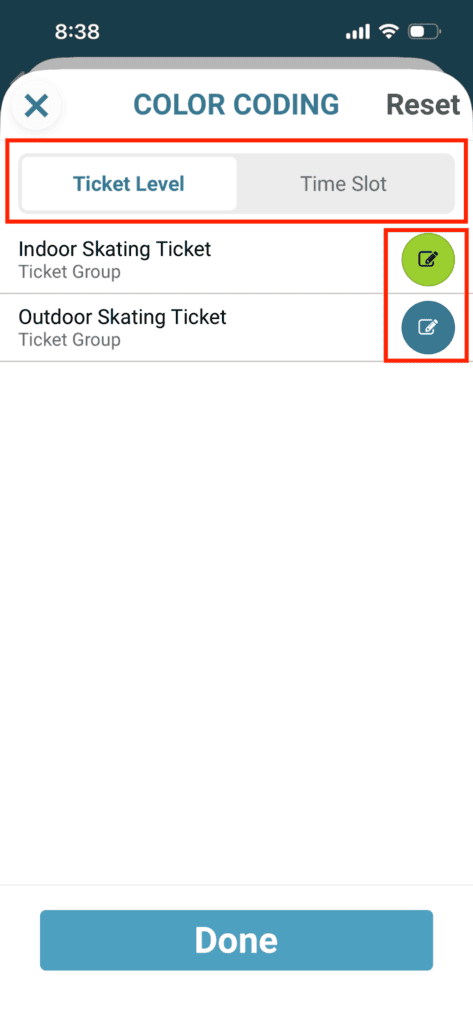
Use the tabs at the top of the Color Coding page to assign colors to specific Tickets and/or Time Slots. Color selection includes a color picker/scale, Hex Code field, and common colors to choose from:
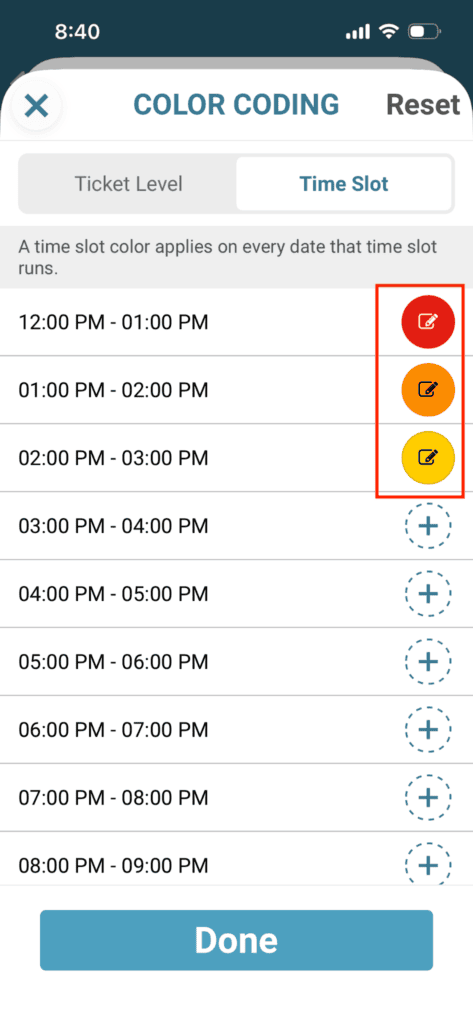
Ticket Level Color Coding shows on the left hand side of the ticket purchases and individual tickets. Timeslot Color Coding shows on the right hand side of the ticket purchases and individual tickets.
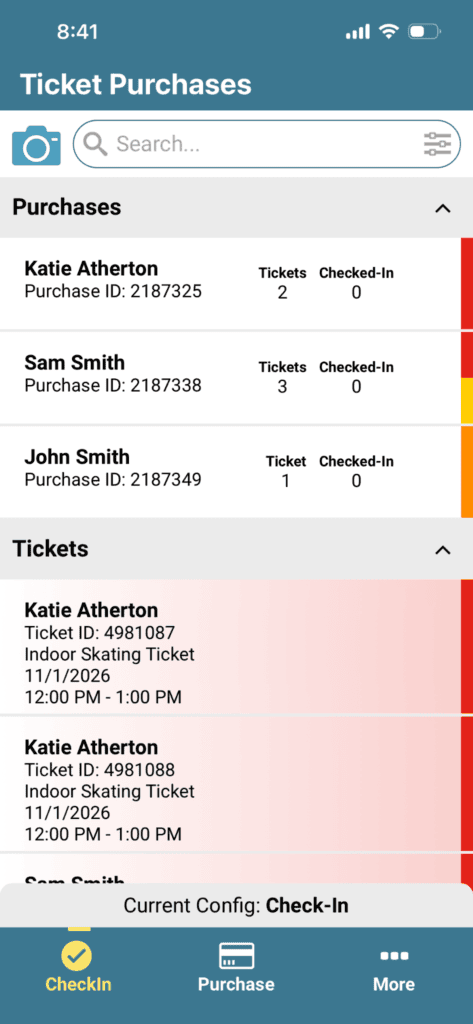
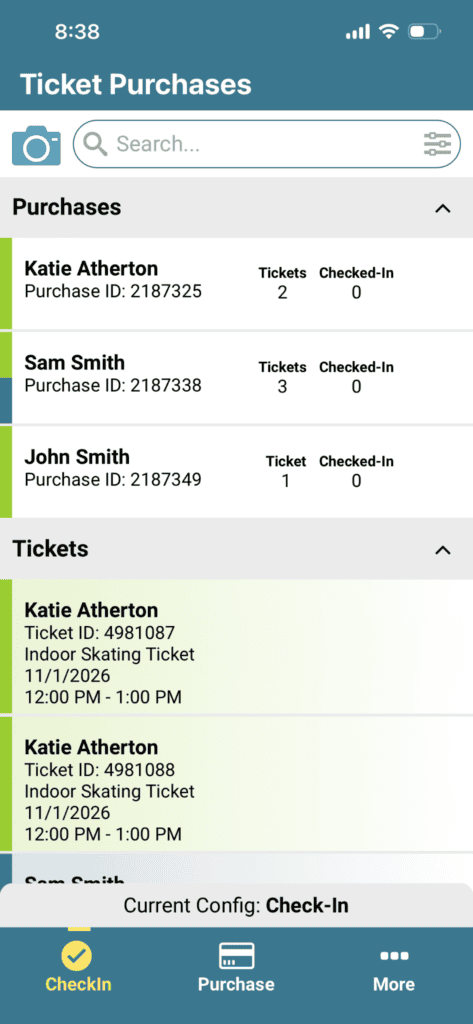
Note: Both of these color coding settings can be turned on at once (colors will show on both sides of the tickets/purchases).
These colors will also be displayed on the individual tickets with a purchase.
Device Filters
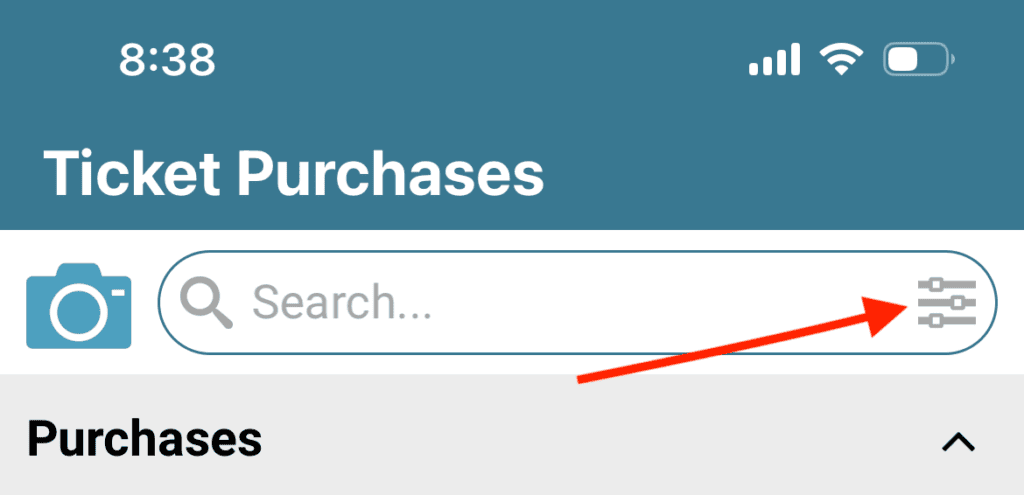
Color Coding can also be set within the device filters. To set this up, click the filters button on the right hand side of the search bar in the lookup list.
Select the Color Coding tab under the Filters section.
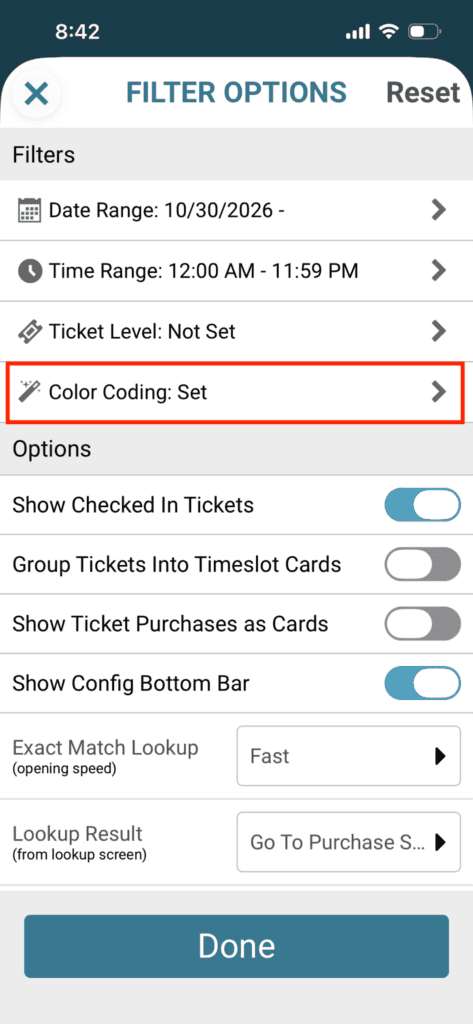
From here, you can set color coding on the ticket levels and time slots (in the same way you would in the configuration settings). Note: Whichever settings are saved most recently (i.e. Filter Options color coding vs Configuration Settings color coding) will apply.
Dynamic Timeslot Display
You can now set custom rules on which timeslots (or what range of timeslots) are available for checkin at any given time. For example, if you have 30 minute timeslots and would only like to allow tickets from the next two timeslots to check in at any given time, you can use the dynamic timeslot display settings to control that.
It’s found in two places: the configuration and the per-device filter settings.
Configurations are recommended for events running multiple check-in devices. To set this up in your event’s configuration, go to More >> Event Settings in the app. Click on Configurations, then add a configuration or edit your existing one.
Click on the Lookup List tab, then scroll down to Filter Tickets By:
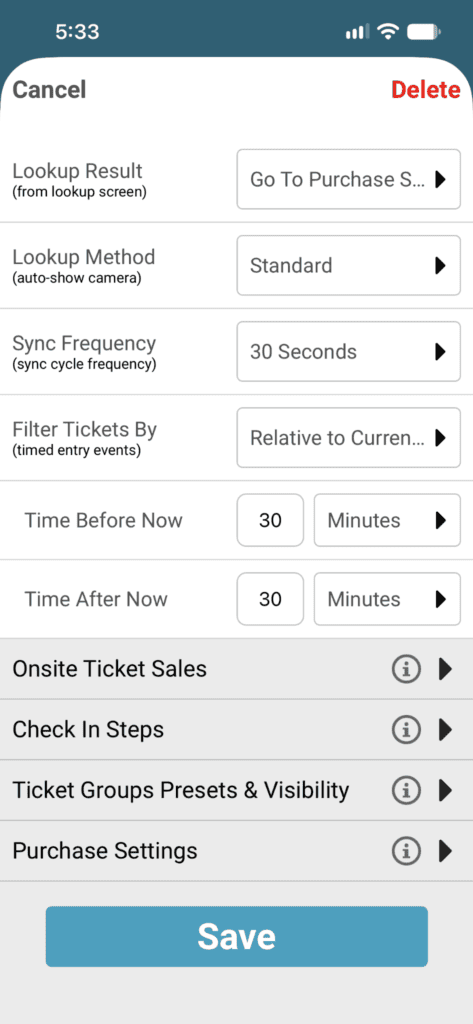
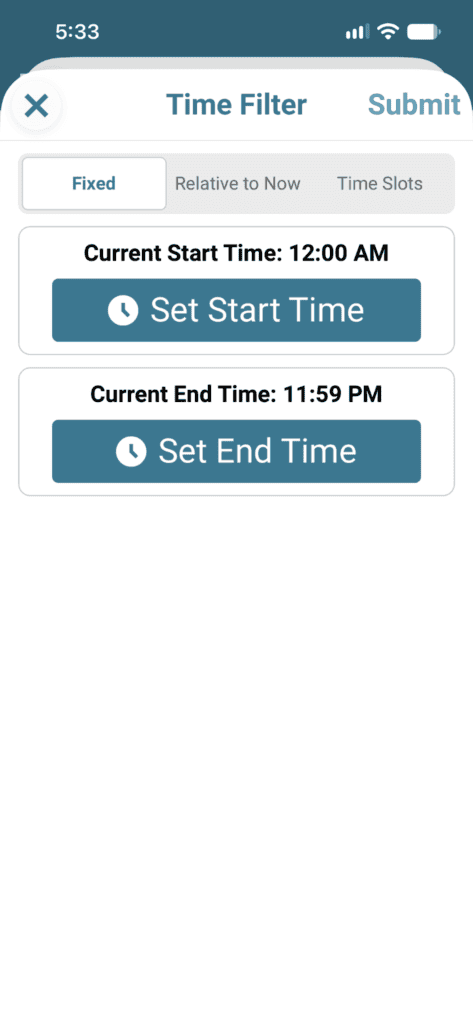
- Fixed Time Range will show all tickets with timeslots within a given set of hours (default is all day– 12am to 11:59pm).
- Relative to Current Time will show all tickets with timeslots relative to the current time when checkin occurs. Again, an example would be if you wanted to allow tickets in the next two 30-minute time slots to check in, but prevent any tickets in the past or further out than one hour from checking in.
- Select Time Slots lets you select the exact time slots you want to display. This is only useful as a configuration setting if your event has identical time slots each day (like a morning and an afternoon tour) and you want to restrict your configuration to only allow checkins for one or the other (perhaps you want to have a morning configuration with different checkin steps than the afternoon).
When the configuration is active, the list of available tickets in the main screen of the app will change based on the setting. Only tickets eligible for checkin will show. If you scan a ticket outside of the range you set, it will show a message explaining that the ticket is either invalid or outside the available range. It’s important to train your staff on how you want to handle this situation at your event.
You can also access the same settings through the filter option in the lookup list. Note: Whichever settings are saved most recently will apply.
Grouping Tickets by Timeslot and Card View
Events now have the ability to group tickets either a timeslot and/or by purchase across their entire event. This is a configuration setting, and is also now available in the filter options for events that don’t use a configuration.
These settings can be used for a number of reasons, including:
- Viewing tickets grouped by timeslots for events such as tours or classes, which might want to display their next session as a “roster” or list of expected attendees rather than an unsorted list
- Easily viewing the attendees checked in for a given time and who has not arrived yet
Example event that might use this: recurring tours with a relatively low number of spots that happen daily or on the same schedule each time
Events that prioritize the guest experience when checking in (prefer not to use QR code scan or want a quick roster to view in app)
Configuration Settings
To group tickets by timeslot or cardview for a configuration, navigate to More >> Event Settings in the app. Add a new configuration or click into an existing one.
In the Lookup List settings, you can use the Group Tickets Into Timeslot Cards and Show Ticket Purchases as Cards checkboxes.
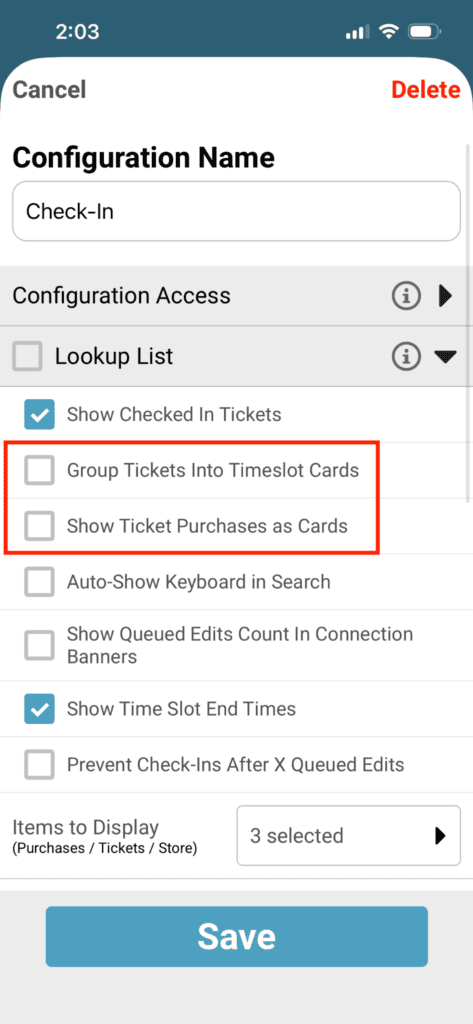
Group Tickets Into Timeslot Cards
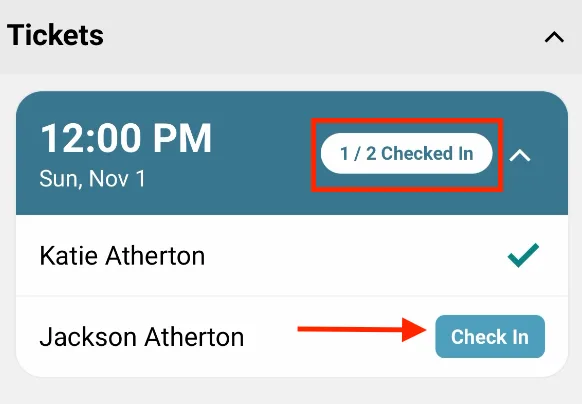
Using the Group Tickets Into Timeslot Cards option will display tickets by timeslot in the lookup list:
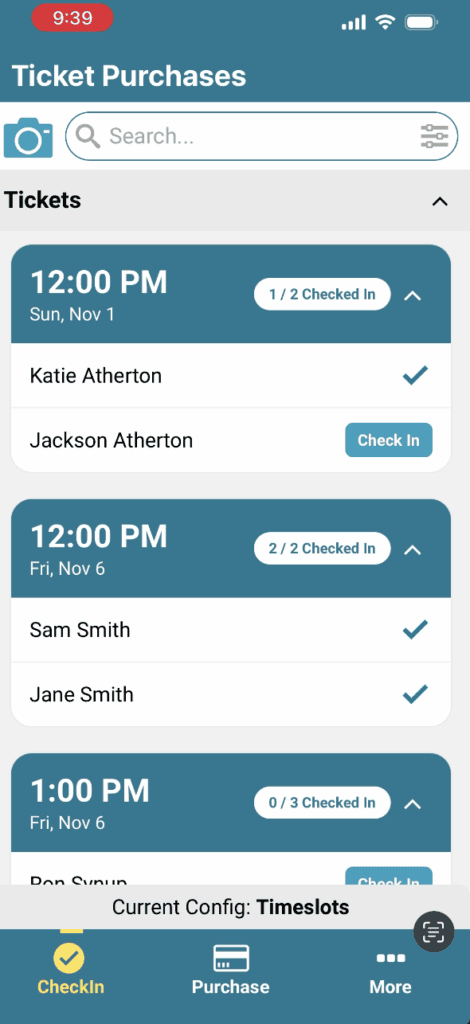
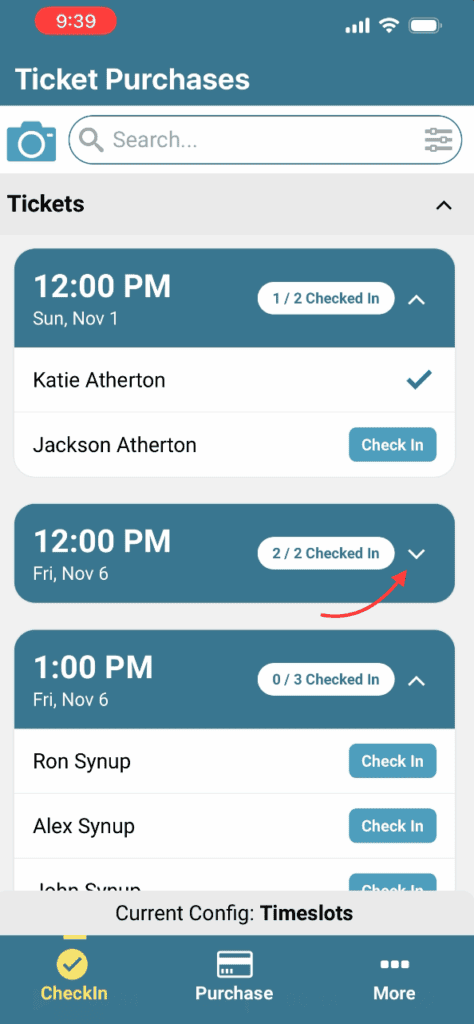
Within each timeslot, you can quickly view and check in all tickets within that timeslot. You also get a quick view of how many tickets within each timeslot have been checked in.
Collapse timeslots to make more room on the page and more easily scroll through each timeslot:
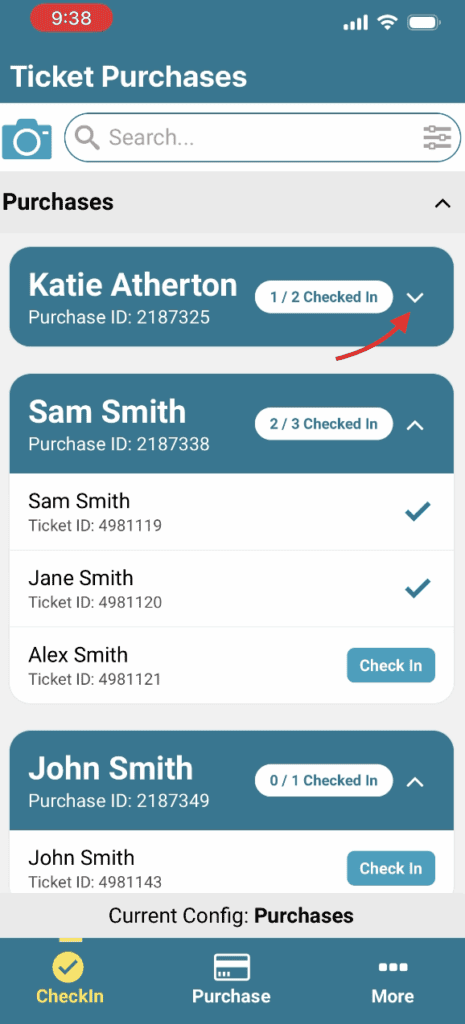
Show Ticket Purchases as Cards
Using the Show Ticket Purchases as Cards option will display tickets by purchase in the lookup list:
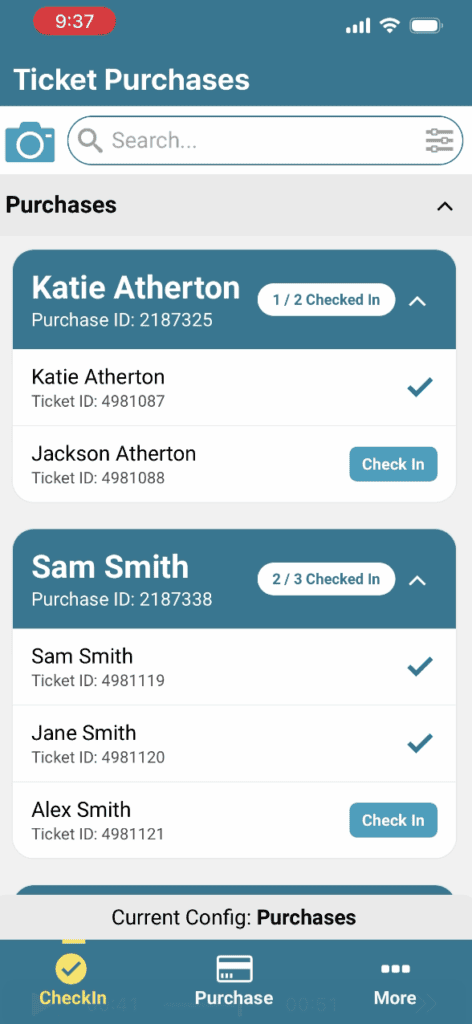
You can quickly view and check in all tickets within that purchase. You also get a quick view of how many tickets within each purchase have been checked in.
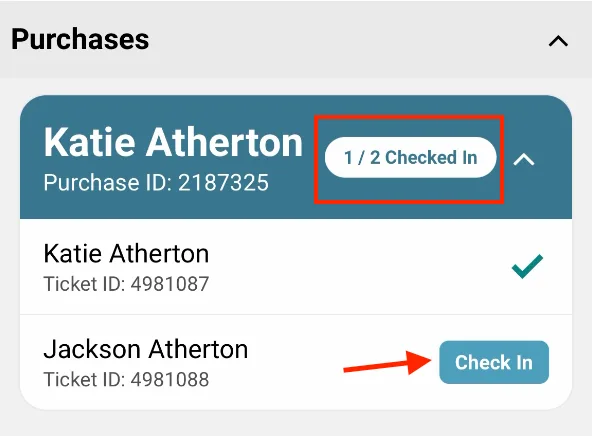
Collapse purchases to make more room on the page and more easily scroll through purchases:
Device Filters
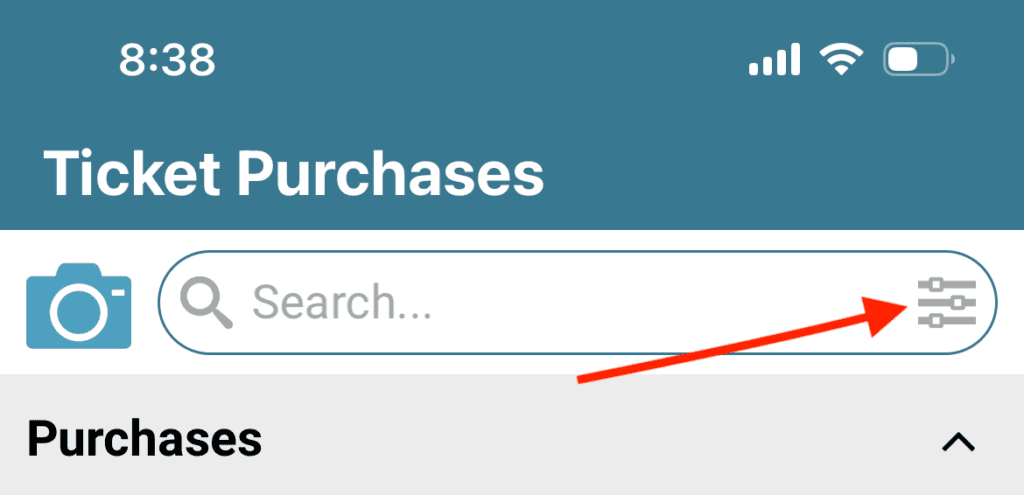
Grouping tickets can also be set within the device filters. To set this up, click the filters button on the right hand side of the search bar in the lookup list.
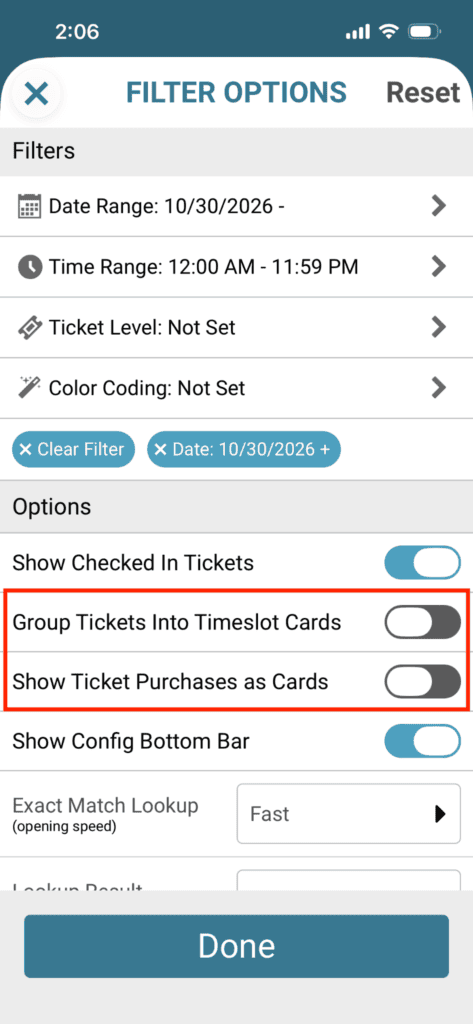
Use the Group Tickets Into Timeslot Cards and Show Ticket Purchases as Cards toggles under the Options section.
Highlighted Custom Question Responses
Events now have the ability to highlight a custom question response for a particular question that is relevant to checkin on the lookup list for checkin. This is a configuration setting.
Examples of information an event organizer might choose to highlight include:
- Team or group name
- Accessibility needs, like “Reached out early and will need elevator access”
- Internal notes on attendee
This can be added to the lookup list through the configuration settings.
To group tickets by timeslot or cardview for a configuration, navigate to More, then Event Settings in the app. Add a new configuration or click into an existing one.
In the Lookup List settings, you can use the Highlight Purchase Question option.
Note: There are two ways to ask a question in TicketSignup. One is to ask once per purchase, and the other is to ask once per attendee. This is configured in your dashboard under Event >> Questions >> Edit Question, and is controlled the checkbox for Ask Each Ticketholder. Questions that are asked once per purchase are considered “Purchase Questions” in the app, and questions asked once per ticket are “Ticket Questions.”
Purchase Questions
In the Lookup List settings for your event’s configuration, select the question you want to highlight in the lookup list.
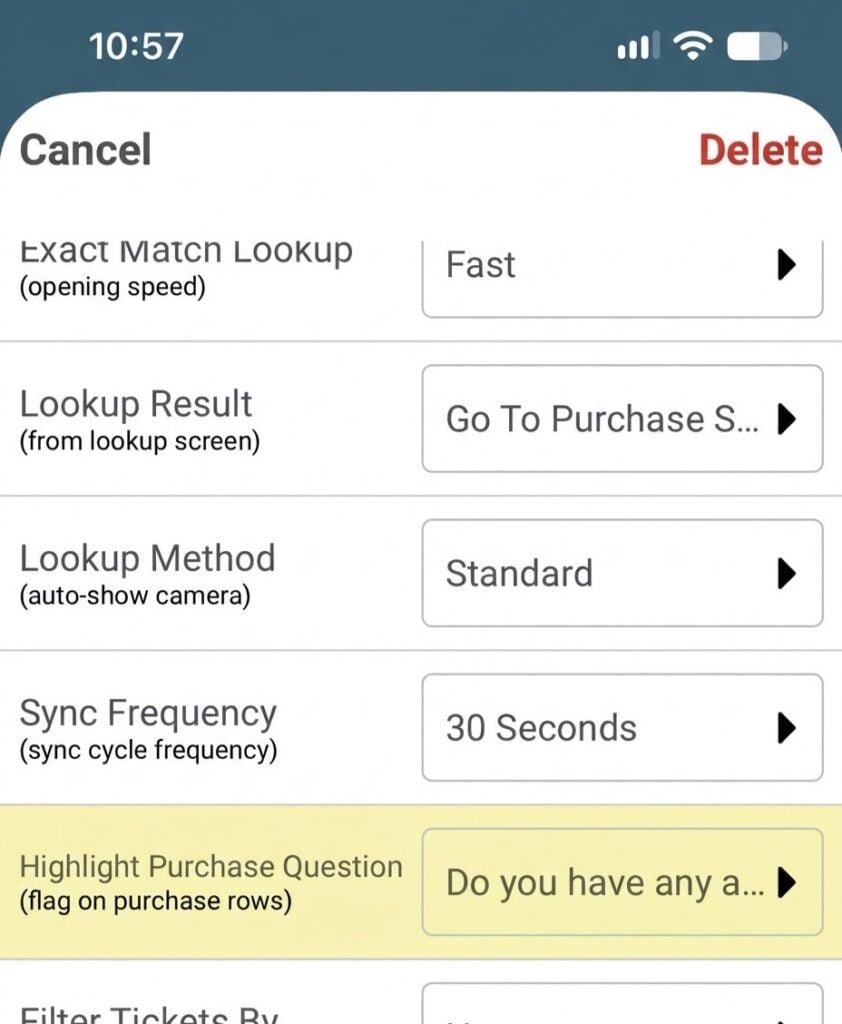
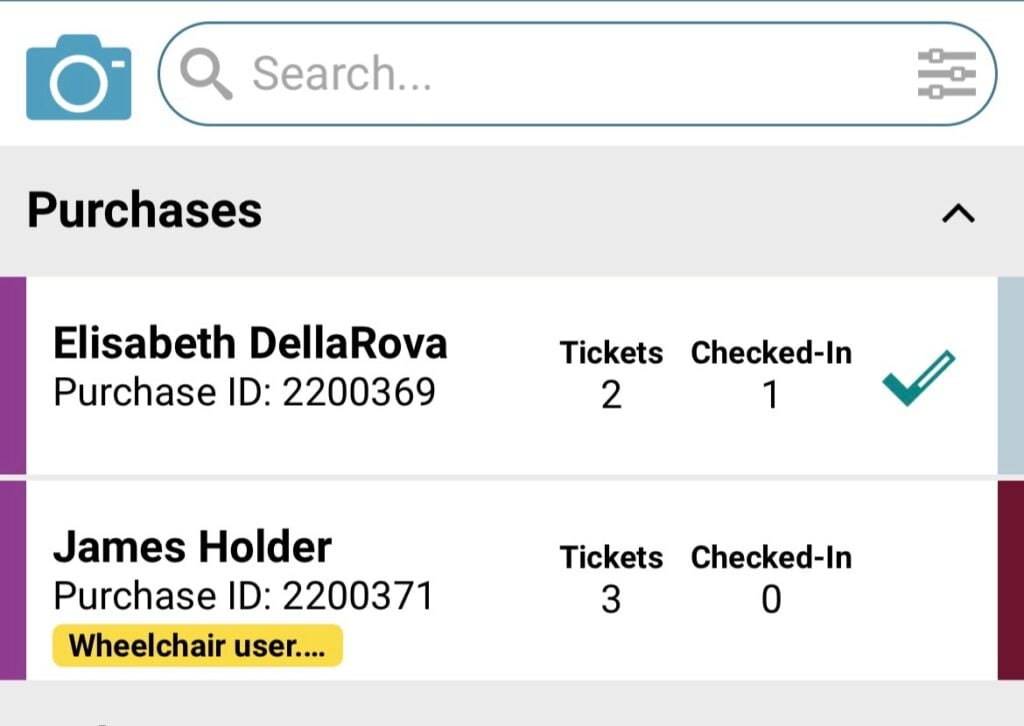
In this example, it’s “Do you have any accessibility needs?”
If someone responded to the question, their response would appear like this so that staff would see it before even tapping on them to check them in:
Ticket Questions
If the question is set up on the per-ticket level, its responses can be shown in the list of tickets when checking someone in.
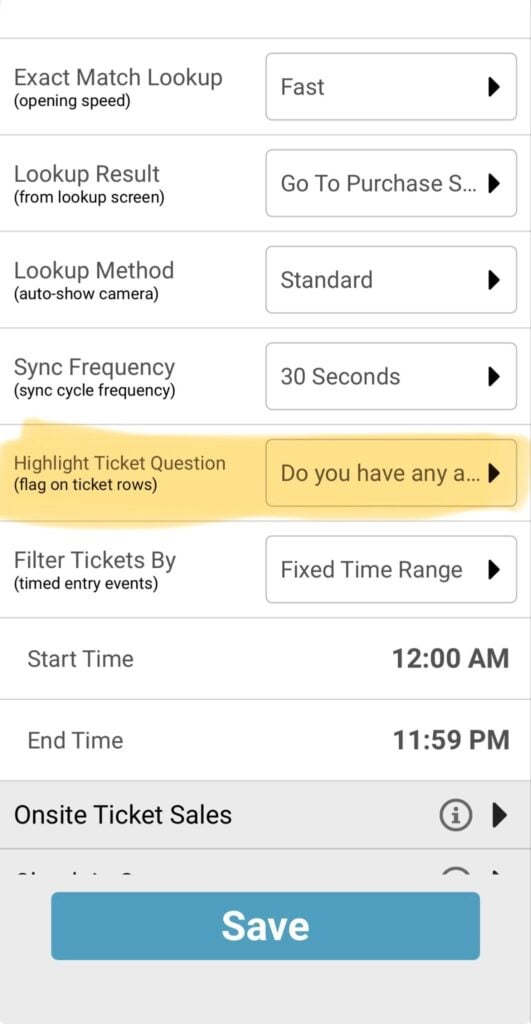
In the Lookup List settings for your event’s configuration, select the question you want to highlight in the lookup list under Highlight Ticket Question.
It’ll show the question response on the ticket it’s answered for:
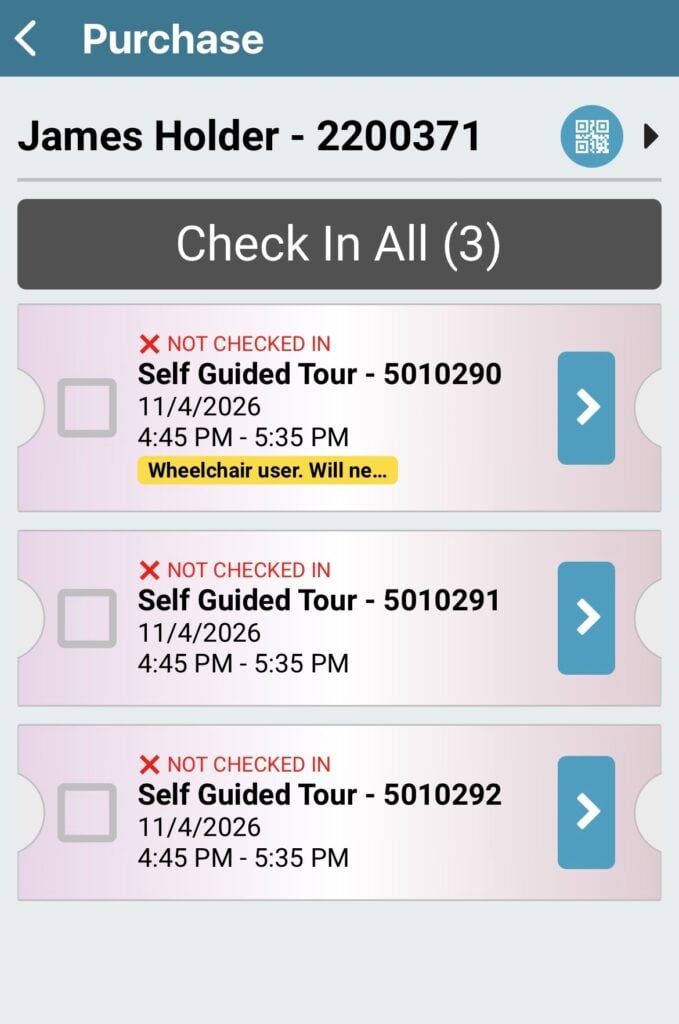
Clicking into the individual ticket will show the full response.
We’re excited to roll out these updates, and hope events find them helpful to design the check-in app experience they need for their staff!