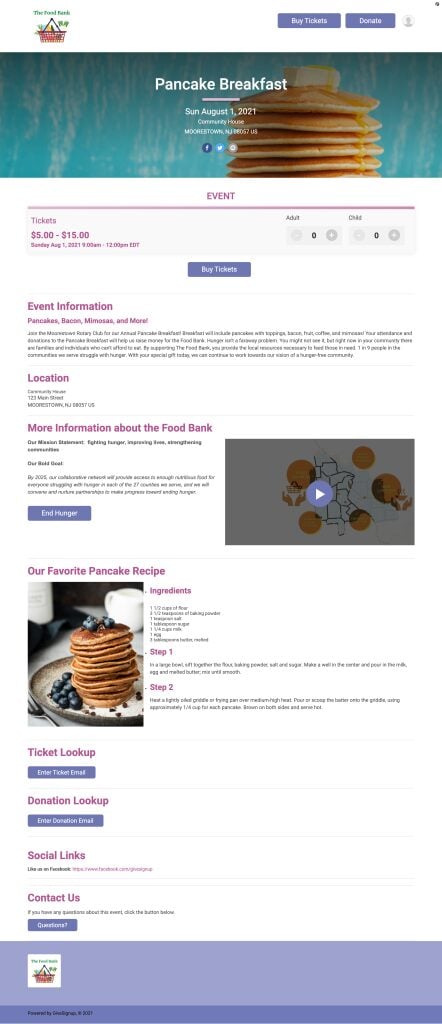
TicketSignup’s new Website Builder enables your organization to add custom content sections to your free ticket event website. Include images, video, playlists, call-to-action buttons, and formatted text to feature additional information about your event and your organization on your event’s website. Ticket event websites are easy to create and even easier to manage with the Website Builder.
This blog walks through how to navigate the Website Builder and add different content types to your ticket event website, as well as a peek of what’s coming next to the Website Builder!
Navigate to the Website Builder
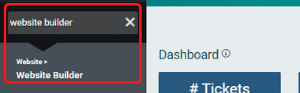
To access the Website Builder, type “Website Builder” into the menu search on your Ticket Dashboard, then click the link to go to the Website Builder.
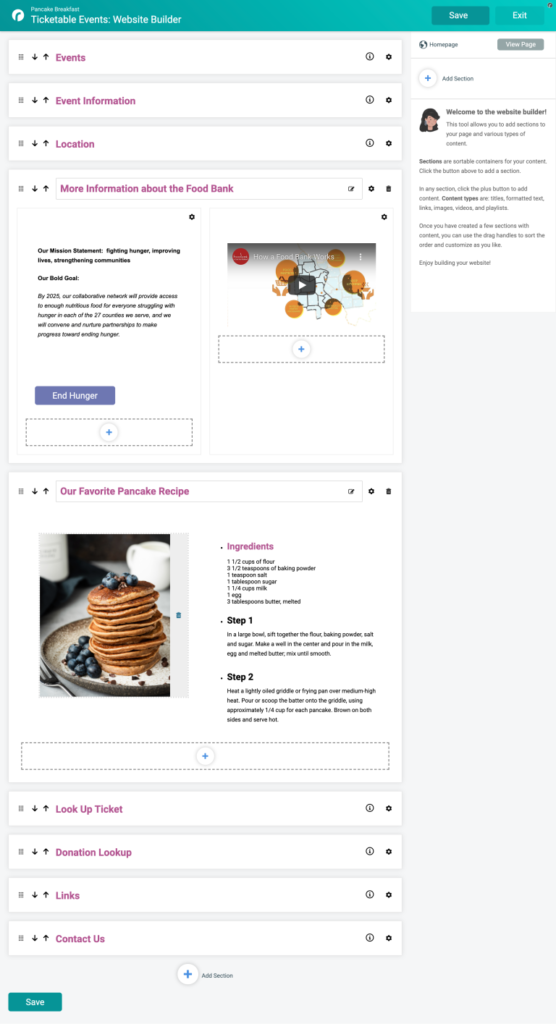
The Website Builder gives you an intuitive and easy interface to add custom sections that feature your content. You will see some default sections that are automatically generated for your website based on information that you completed in the Ticket Wizard. Note that you can still enable a cover page for your Ticket Event website when you use the Website Builder. Your custom content will appear on the Event Info tab of your website.
Rearrange Sections
You can easily rearrange the order that content appears on your website. There are drag-and-drop handles on the left side of each section tile to easily move sections around. There are also up-and-down arrows that make it easy to rearrange expanded sections on a desktop or on mobile.
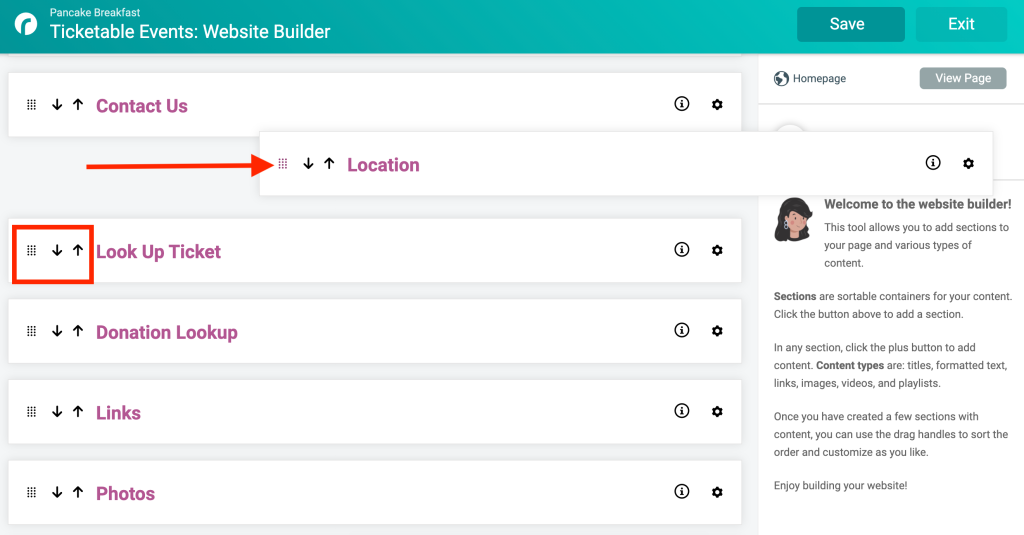
You will have the same options to rearrange the order that content appears within a section. For example, you can rearrange the order that text and a call-to-action button appear within the same section.
Add and Edit Sections
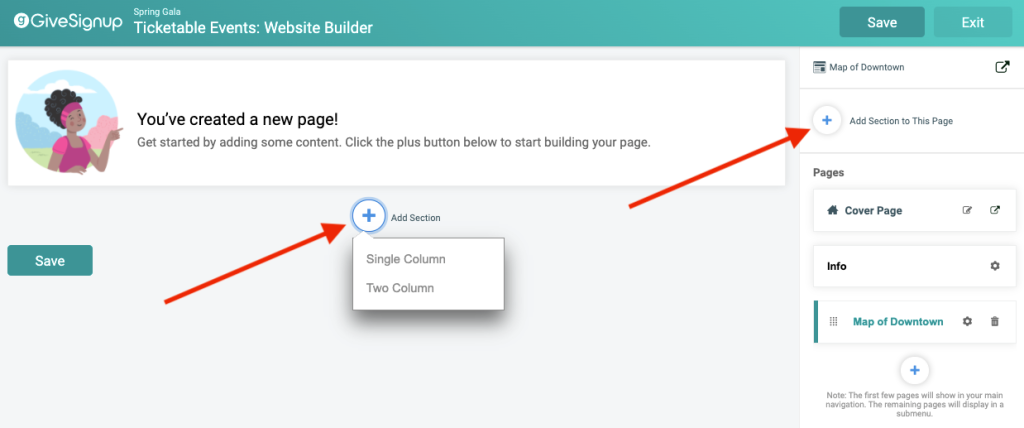
To add a new content section to your website, click Add Section on the right navigation panel. There is also an option to add a new section at the bottom of the Website Builder to make it easy to add more content as you are building your website.
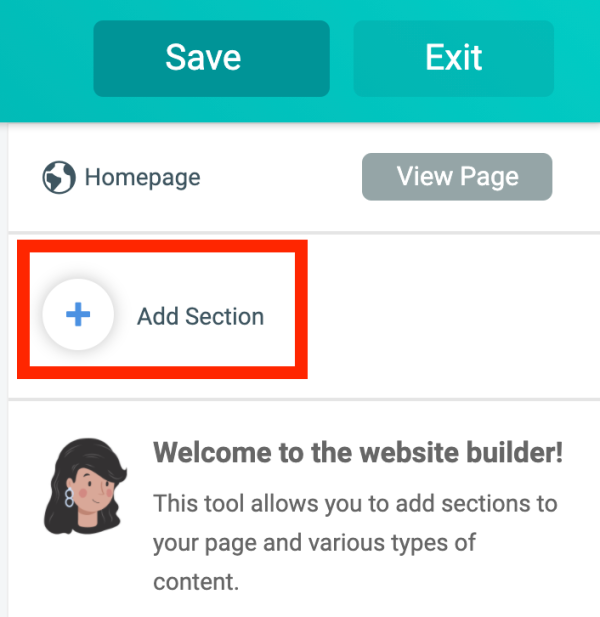
There are two options when you add a section: Single Column or Two Column.

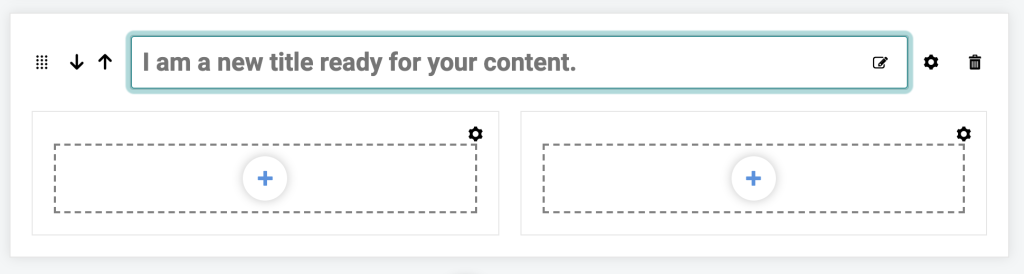
When you create a new section, add a title in the top text box.
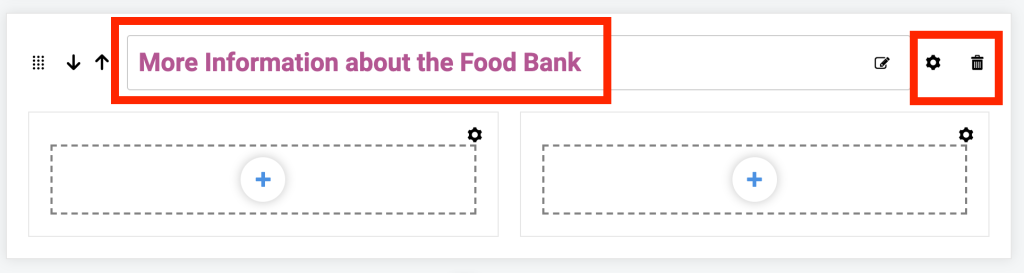
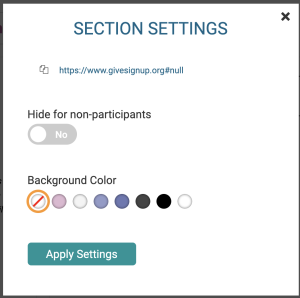
The gear allows you to customize section settings, including adding a section URL that allows you to link to a specific section on the website and an option to hide the section. In the future, we will add more settings, including a publish date so that you can set a specific date or timeframe when you want a piece of content to show. There is also a trashcan to delete a section.
After adding content to a section, you’ll also have the option to customize the background color. Note that the color choices available are linked to your Ticket Event’s theme colors that are set in the dashboard.
Click the plus sign on any section to start adding your content. You can click Save at the top-left of the page at anytime to save your custom sections.
Text
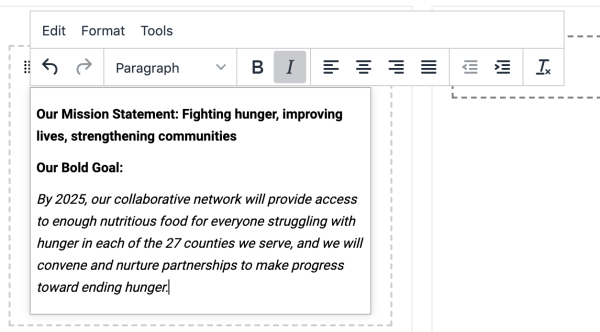
When you add custom text, an editor will appear to give you flexible formatting options, including headers and extensive format options.
Call-To-Action Button
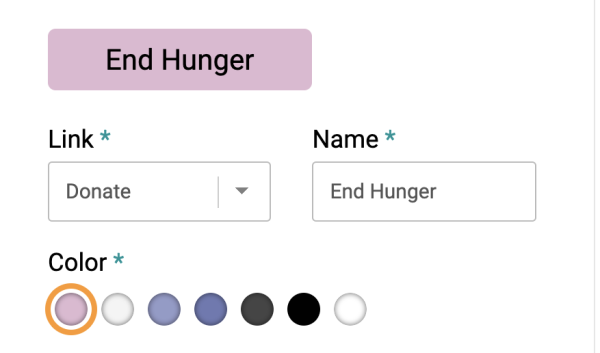
You can add CTA buttons throughout your content sections. Buttons can redirect to common actions on the ticket website, like ticket purchase or the donation page. They can also be used for any custom URL; for example, you may want to link attendees back to your organization’s main website. After adding a button to any section, click Edit Me to customize. The preview of the button will update in real time as you add button text and choose a color.
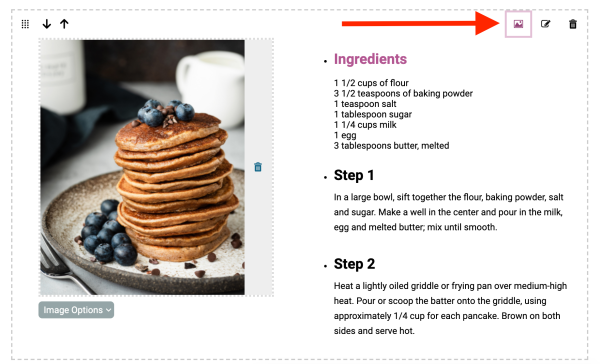
Image
When you add an image, you will have an easy upload option that allows you to drag and drop or search for an image to add. Once you’ve add an image, there is an Image Options dropdown that gives you formatting options to customize the alignment and size.
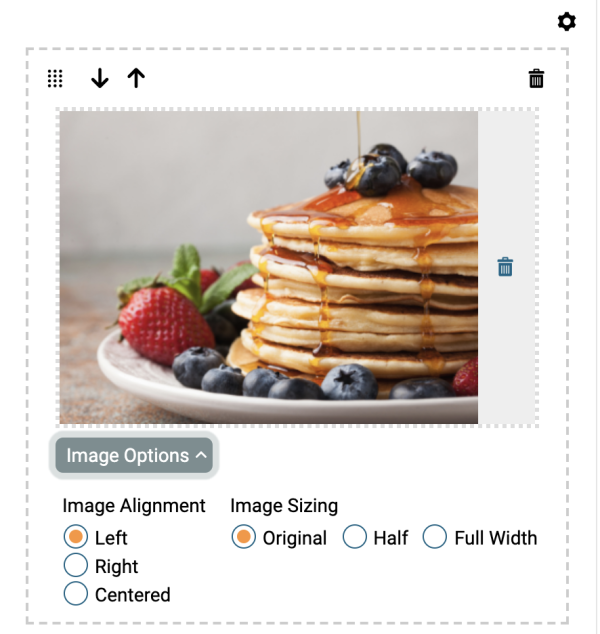
To add an image to an existing text block, click the image icon in the upper right corner. You will have the same flexible alignment and sizing options when adding an image to a text block.
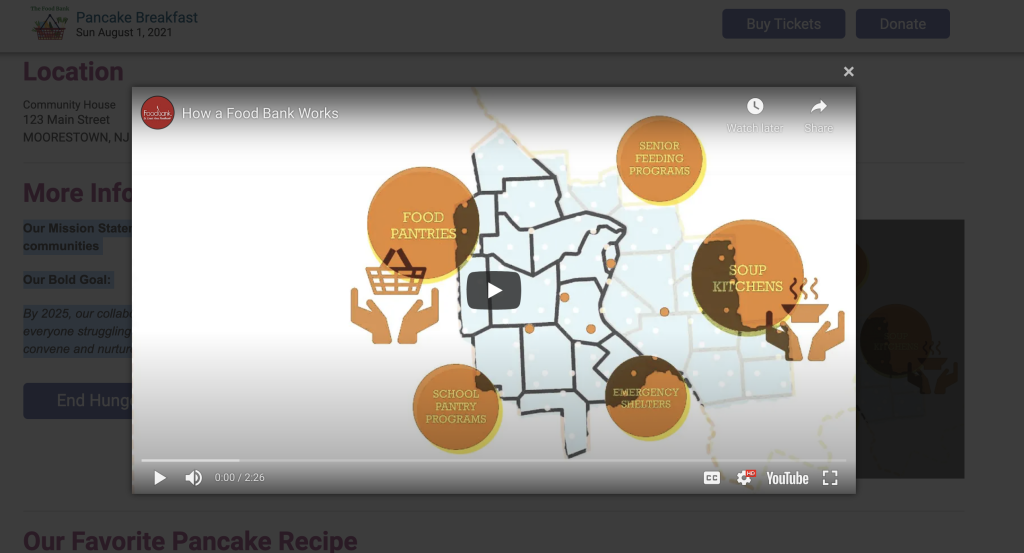
YouTube Video
To add a YouTube video to a custom section, paste the video ID in the text box.
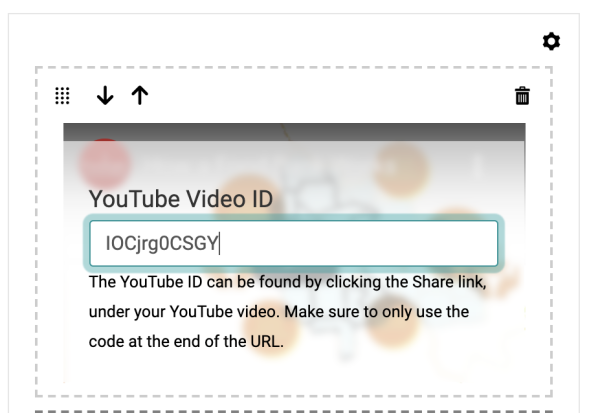
The website builder will use the cover image from the YouTube video. When a supporter clicks to view the video, it displays nicely on the website with a pop-out viewer to play the video, and the supporter can easily return to the website when done. This is an easy way to include video content without redirecting your website visitors to a different URL.
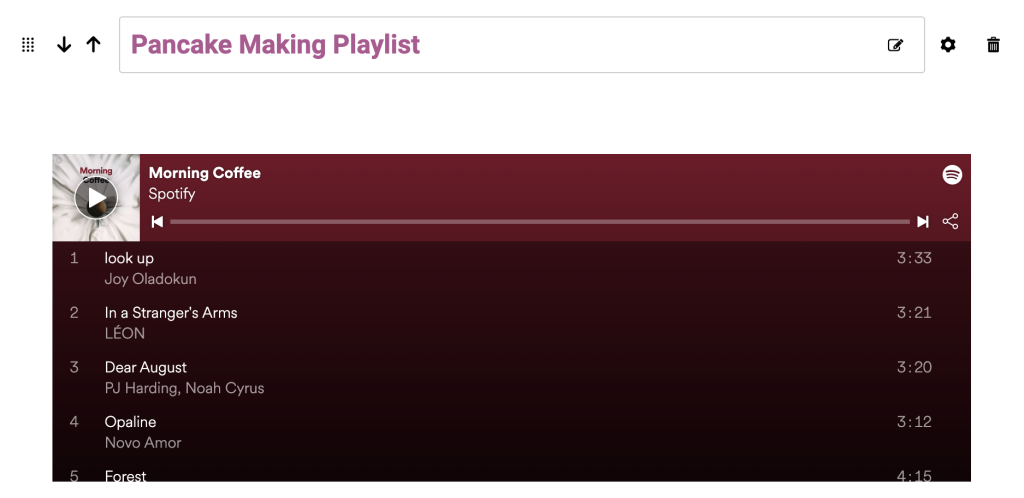
Playlists
You can also feature playlists from Spotify, YouTube or Apple Music. This is a fun way to add more interactive content to your website, especially for virtual and hybrid events. When you paste the link to a playlist, there is a nice display formatting that shows the playlist directly on your website.
Pages and Menus
n addition to being able to add valuable content, like images and call-to-action buttons, events can add unlimited pages to their ticket event websites in any order of appearance in the menu header.
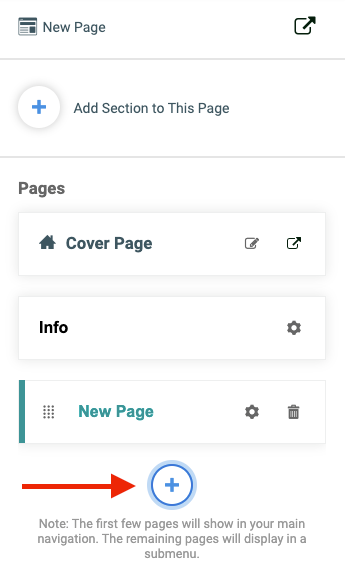
Add Unlimited Pages
Now, the cool part: On the right side of the Website Builder, you are able to add additional pages to your ticket event website. Use these pages to organize information about your organization, specific details about your event (parking, schedule, etc), other upcoming events, and more ways to engage with you. Examples include:
- Thank your sponsors and bring attention to your community partners.
- Provide a recap of the previous year’s event
- Link directly to a photo album from a previous year
- Thank donors and volunteers.
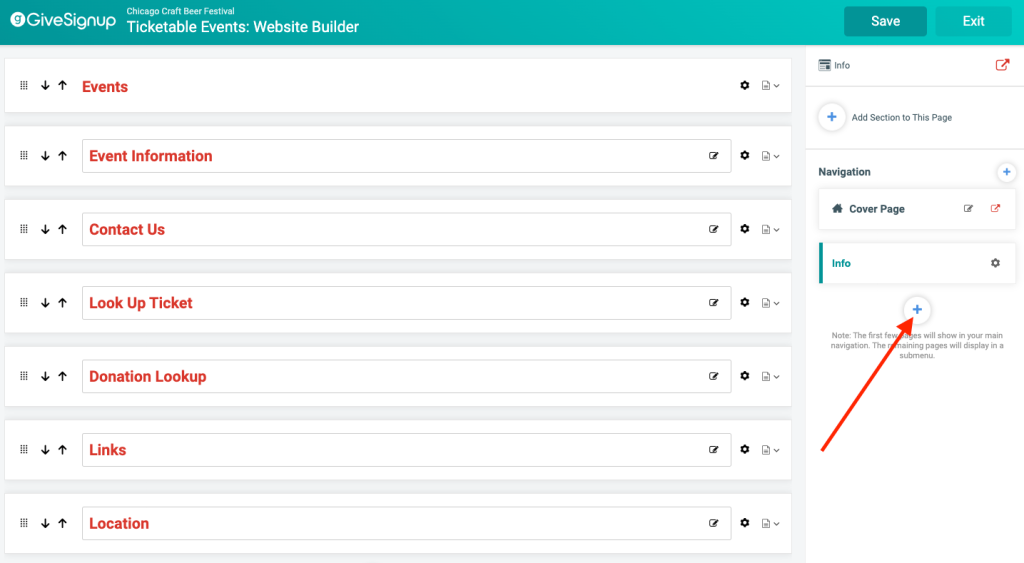
To add a page, simply click on the plus symbol on the right side of your dashboard and below the Info page tile.
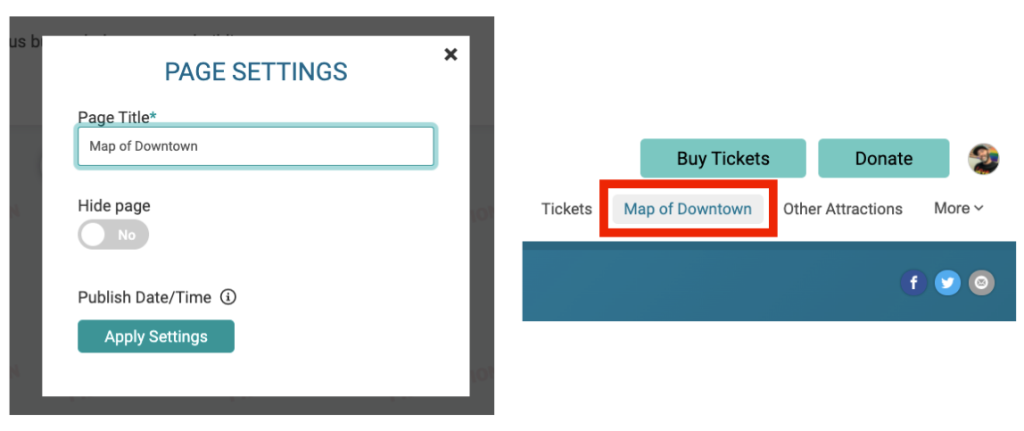
A pop-up will appear that allows you to name the page and set the visibility of the page. The page title you enter will also serve as the menu label that will appear in the menu header at the top of your ticket event website.
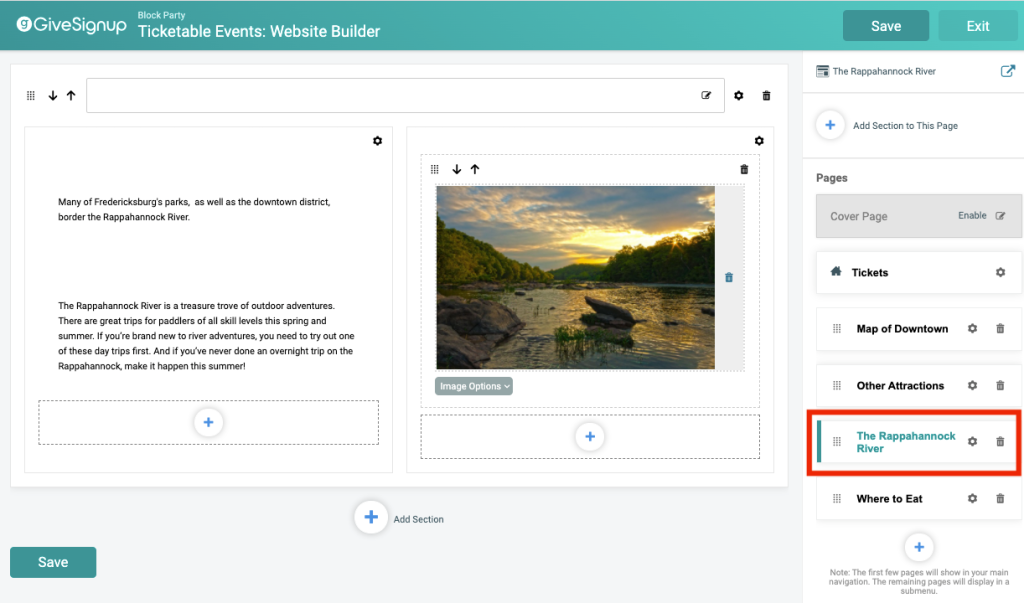
Add and Edit Content Sections
Now, it’s time to build! Like you saw with the default Info page above, you can add content by clicking on the plus symbol on the left-hand side or at the top of the right sidebar. You can add a section with one or two columns.
For each new content block, customize the headline with simple and helpful text.
You will then add the content for the section by choosing between several options the appear in a drop-down after clicking on the plus symbol within the section.
Note: You are not limited to just a single piece of content or even a single content type. You can add an unlimited number of content pieces within any given section.
Configure Page Settings
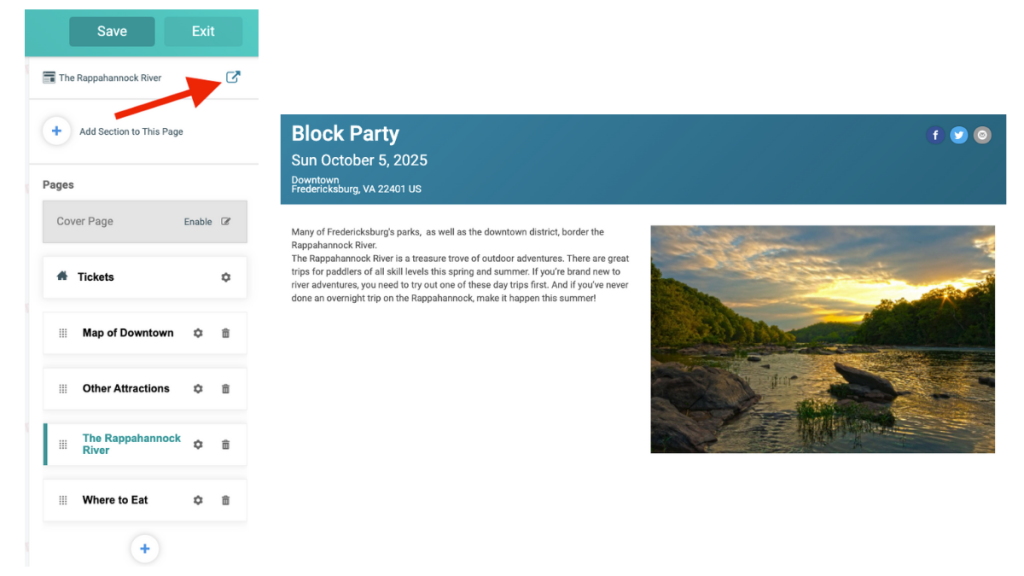
With your first page built, you can return to the page at any time to make changes or add additional content. Click on the name of the page on the right side of your dashboard to edit your content. You’ll notice that the page you selected is shown with green text and a vertical green bar.
At the top, the name of the page will display with an icon that, when clicked, will take you to the actual page so you can view how it will appear on your ticket website.
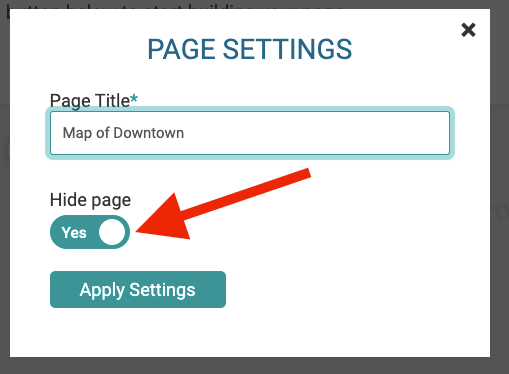
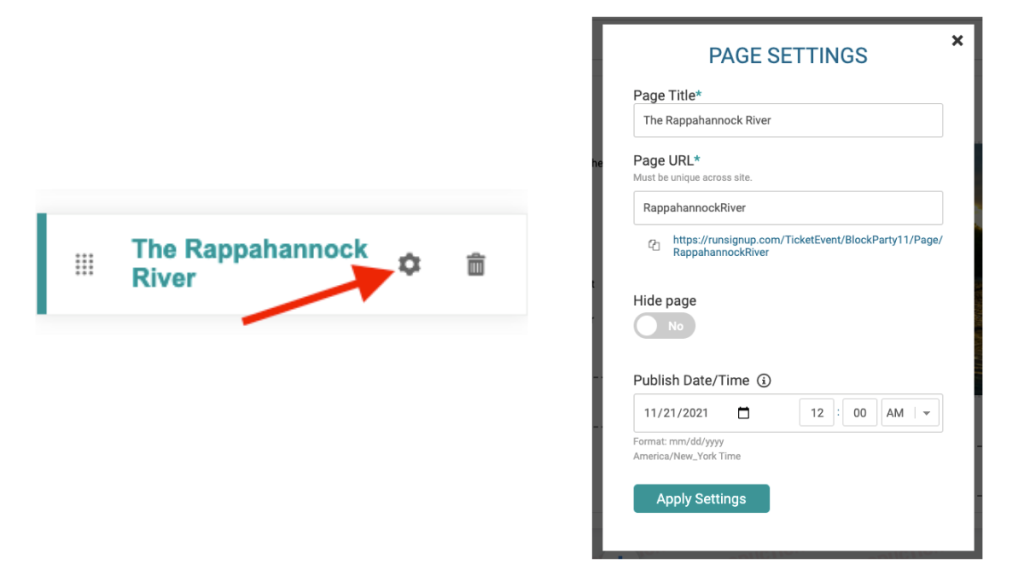
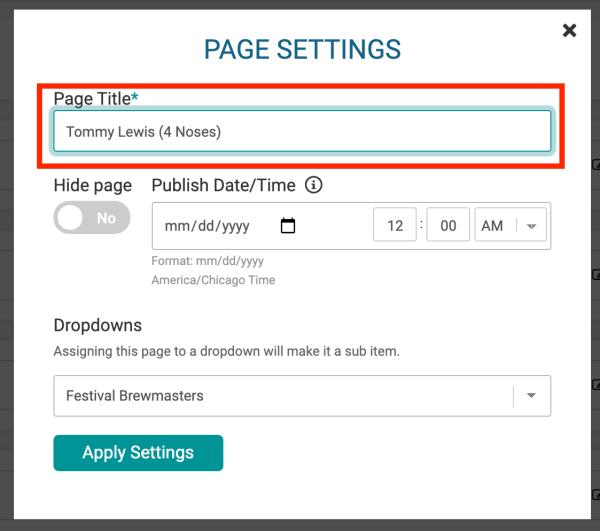
For further customization, click on the settings icon for the page you want to edit. There, you can rename the page title, customize the page’s URL, change its visibility, and indicate a date and time when you would like the page to be live on your ticket event website.
Enable and Edit Cover Page
From the Website Builder, you can easily determine if you are using the default homepage layout or if you are using the cover page tool.
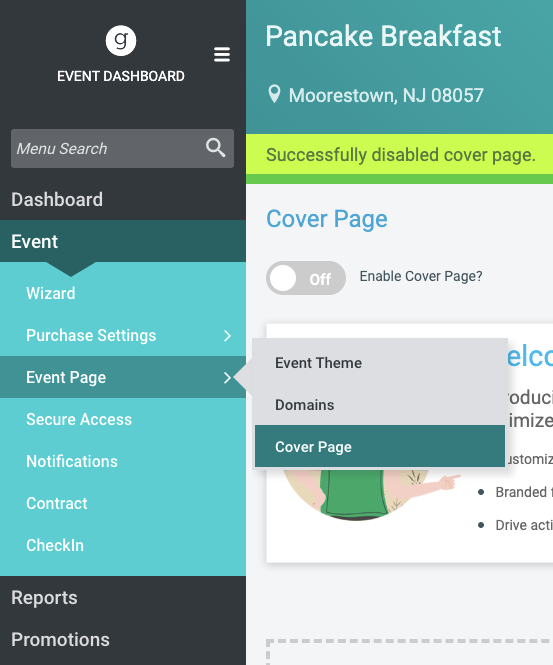
By clicking on the edit icon, you will be taken directly to the cover page settings to either enable, disable, or edit and add content. If enabled, the view in window icon button will show you how the cover page currently appears. Check out our “Ticket Event Cover Pages” blog about cover pages for ticket event websites, which includes a tutorial on how to set it up.
Dropdowns and Subpages
Dropdowns and subpages allow you to organize information together and group content logically, resulting into a professional and valuable resource.
Add a New Dropdown
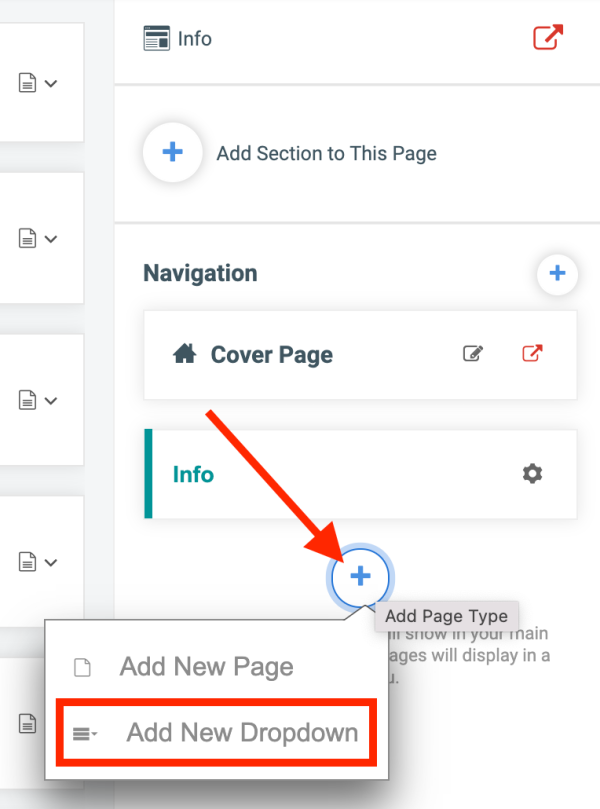
On the right sidebar, click on the plus symbol to add a new dropdown. Note: This is also the same place where you will start to add standalone pages.
In the dropdown that appears, you’ll notice two options: “Add New Page” and “Add New Dropdown.” Select “Add New Dropdown” to start building your sub pages. A dropdown represents a group of related pages organized under a descriptive heading.
A pop-up will appear with several options for configuring the header of the dropdown. You can change the title, hide the dropdown, and set the date on which the dropdown will be live and visible to the public.
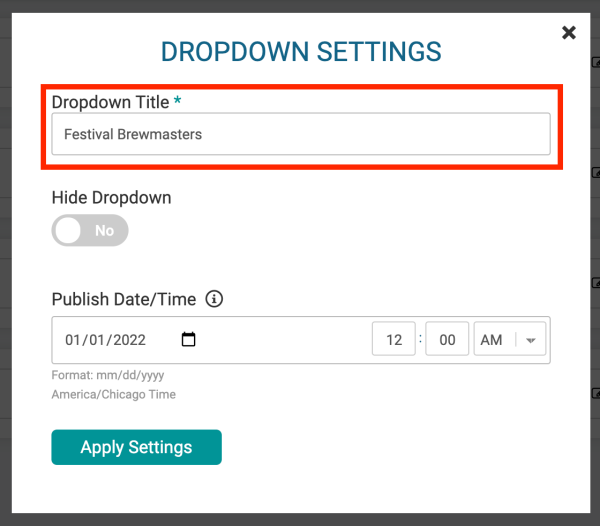
Note: The date and time settings are applied according to the time zone in which the event takes place.
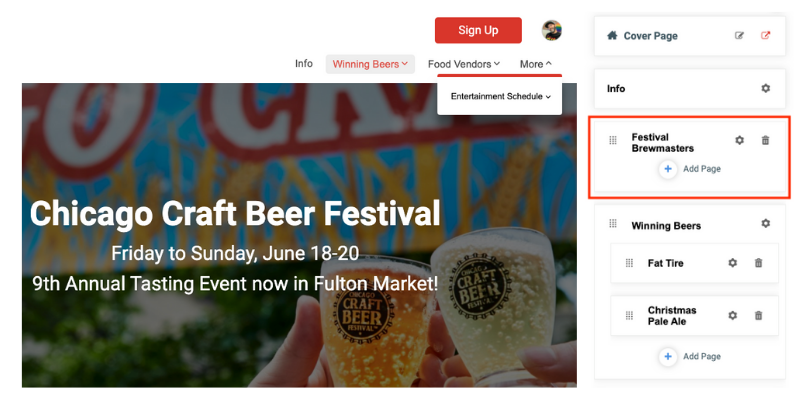
After successfully creating the dropdown, you will notice that two items have been generated:
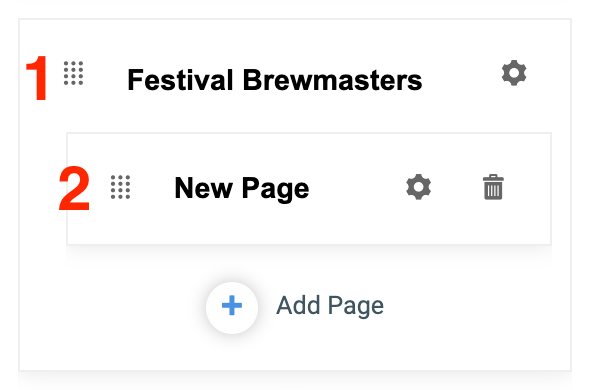
No. 1 is the top-level menu header for your dropdown, while No. 2 is the first page that appears in the dropdown menu.
To edit the name of the newly created subpage and configure additional settings, click on the settings icon.
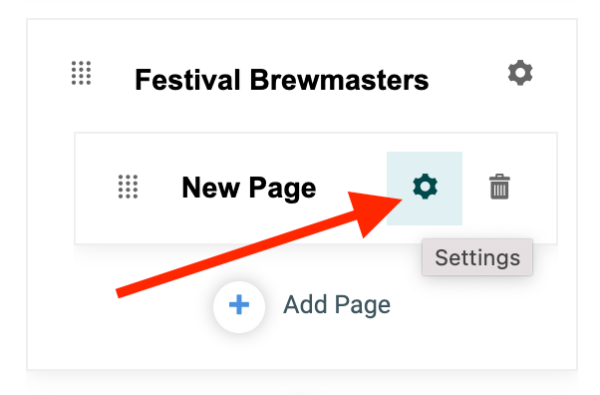
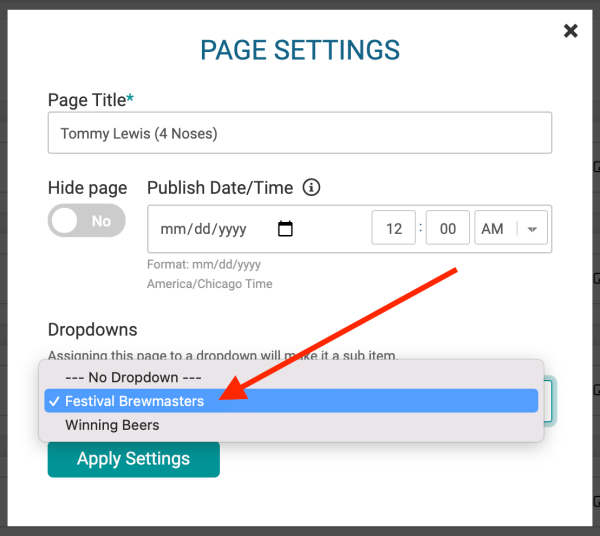
Here, you can change the page title, visibility, live date, and the dropdown heading you want the page to appear under.
You can quickly move pages under different top-level menus by selecting a new header from the dropdown.
Add and Edit Content Sections
To edit a new subpage and add content according to the same steps above. To start, click on the name of the page and a green bar will appear to indicate which page is being edited.
Rearrange Order of Pages and Subpages
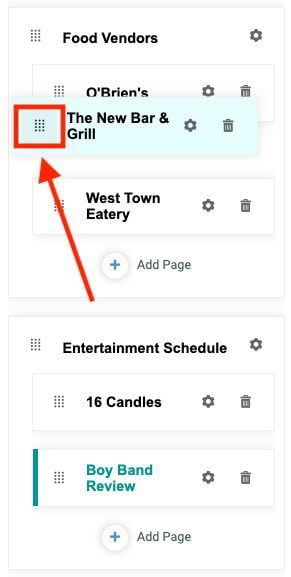
Now that you have created dropdowns with subpages, you can easily rearrange the order that your dropdowns appear in your menu header, along with the standalone pages. There are drag-and-drop handles on the left side of each page dropdown and subpage tiles to easily move pages around to prioritize and highlight specific content.
When you click and drag the tile handle, the element (page, subpage, or dropdown group) you are moving will highlight and move together.

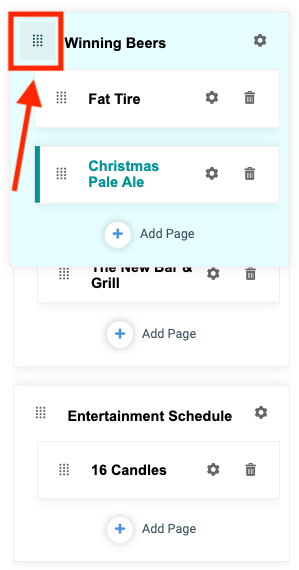
The first few pages and/or dropdowns will show in your main navigation. The remaining pages will display in a submenu. The system automatically makes this determination based on the number of characters used in the title of each standalone page and dropdown. Adjust the length of the names and drag to rearrange the order of dropdowns and pages to achieve your desired layout.

Delete Dropdowns and Subpages
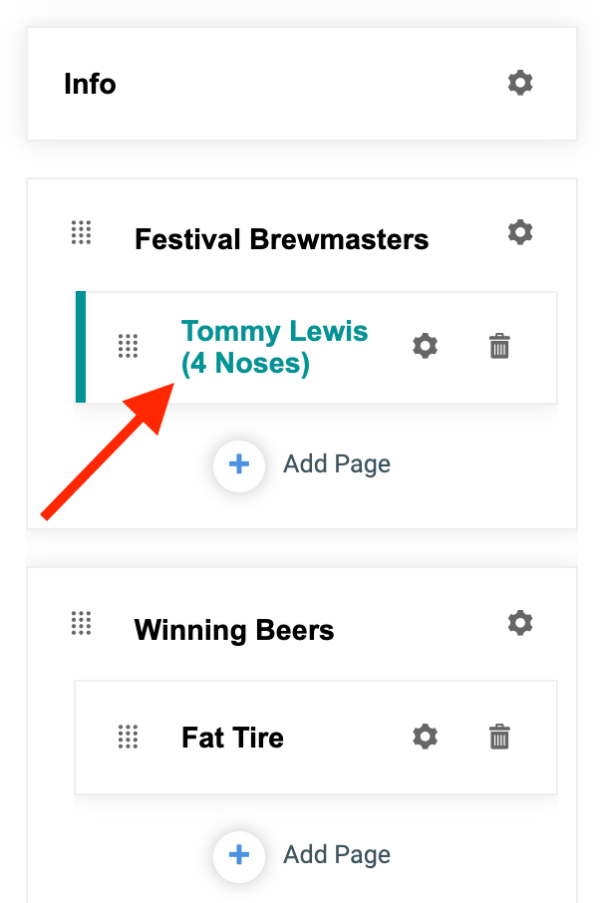
Like standalone pages, subpages can be deleted by clicking on the trash can icon for the subpage you wish to remove.
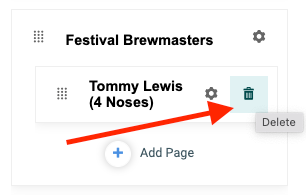
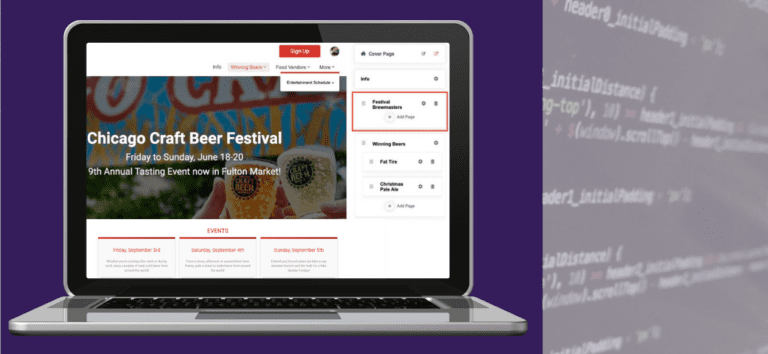
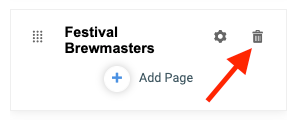
In order to delete a dropdown, you must delete its subpages or move the subpages to another dropdown menu. You’ll note in the screenshot above that the trash can icon does not appear for the dropdown menu header, “Festival Brewmasters” because the “Tommy Lewis (4 Noses)” subpage is still nested under it. In the screenshot below, the subpage has been removed and the trash can icon now appears the dropdown header can be deleted.
Dropdowns Without Subpages
Reminder: The dropdown menu header is only a heading. It is not a page that hosts content. If no subpages are attached to the header, it will not appear on your TicketSignup site. However, it will remain in your website builder for you to assign other subpages to it or it can be deleted.
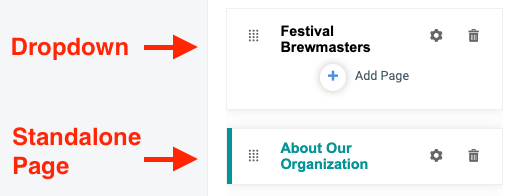
You can identify if a tile in your website builder is a standalone page or a dropdown by looking below its title. If a plus symbol displays within its container below the name, it’s a dropdown. No plus symbol? It’s a standalone page in which you can add content.
What’s Next:
When you add a cover page to your website, you can choose to display different data components, like a donation goal or top fundraisers. We will add the ability for your organization to display these components and more on any page and custom section. This lets your website run on autopilot, with items like dates, price increases, donation goals, fundraiser leaderboards, photos, and more, automatically updating without you making website updates.
TicketSignup’s new Website Builder gives you a free and easy way to design websites for each ticket event. Feature your brand and your mission with a free website that’s seamlessly integrated with ticket sales, donations, and your event data.